Instaling Gears In My 2012 JK

When I bough my Jeep I knew it wouldn't be long before I started to modify it. One of the most important
things I wanted to do was to make it capable of running some 35" tires. The first part is to put in the
lift kit. But the second part was to install gears in the axle to compensate for the tire size change.
When I bought the Jeep it came with the factory installed 3.21 gears. These gears are fine for the stock
225/75R16 tires. My Jeep came with the larger 255/75R17 tires an the 3.21 gears just aren't adequate.
I knew I was going to be making changes so I didn't spend the extra money on the 3.73 gear option.
After some careful deliberation, I setled on 4.56 gears to go with some 315/70R17 Goodyear Wrangler
Duratrac tires. I had considered using 4.10 gears because that would put my RPMs about where they are
with 3.73 gears and my factory tires. However, the larger 35" tall tires are heavier and harder to turn
so the 4.56 gears will give me a little better power at the cost of running 10% higher RPMs on the road.
I decided to do some more upgrades to the Jeep while I was changing gears. All of the changes would have
required repeating the gear installation labor so why not do it while the gears are out. I had to save
up for a while to afford the parts but it's entirely worth it.
When changing gears, it is necessary sometimes to replace the ring gear carrier. The cheap option is to
repace it with an open differential carrier. More expensive options are lockers of various kinds. You
can read up on the different types here. For my differentials, I chose two
different types of selectable lockers.
For the front, I chose an
Eaton E-Locker.
It operates as an open differential until you supply 12v power to it. When you do that, an electromagnet
engages the locking mechanism. This lets you drive the Jeep with the differential completely open until
you need the locker. With the relatively weak front axle, the reduced stress will help ensure the
axle survives as long as it can with the 35" tall tires. With the flip of a switch on the dash, the
differential locks and you get all of the power going to the wheel with the traction.
For the rear, I chose an
Auburn Gear ECTED.
The ECTED is a clutch type limited slip differential that also can be locked. The wiring to the
differential is the same. However, the locking mechanism is different. Most electronic lockers use a
set of cogs that engage and postively lock the two axles together. The ECTED uses an electromagnet to
compress the limited slip clutch packs to the point where they no longer allow slip. This system has its
limits. The bigger the tire and the more power being pushed through the ECTED, the less likely it is
to fully lock the differential. But the ECTED in the JK Dana 44 rear axle is rated to handle 37" tires
so it should work fine for the 35" tires on my JK.
The other upgrade I decided to do was to upgrade the axle shafts. They have to be removed to get the
differentials out to change the gears anyway. It's no extra labor to upgrade them while they're out.
For the front, I simply replaced the shafts with some aftermarket chrome molly steel shafts. They are
significantly stronger than factory steel shafts. For the rear, I decided to not only go with chrome
molly shafts, I decided to buy bigger diameter shafts. The ECTED locker comes in an option that allows
for a larger diameter axle shaft. Both axle shafts should hold up fine to 35" tires.
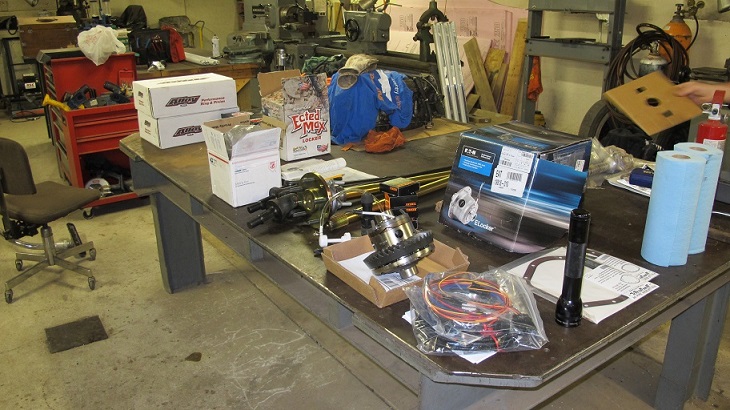
 Once I found someone with the right tools and shop space to do the gear install, I ordered the parts I
needed to install them. There are several specialist tools required to do gear installation, and working
with someone who has experience makes a lot of difference. While I'm an accomplished shade-tree
mechanic, I don't have the expertise or specialty tools I needed. Fortunately, a friend in my local
Jeep club does have the experience and the tools needed to get the job done.
Once I found someone with the right tools and shop space to do the gear install, I ordered the parts I
needed to install them. There are several specialist tools required to do gear installation, and working
with someone who has experience makes a lot of difference. While I'm an accomplished shade-tree
mechanic, I don't have the expertise or specialty tools I needed. Fortunately, a friend in my local
Jeep club does have the experience and the tools needed to get the job done.
We started with the rear axle only to find out that I ended up not having the right bearings for the
ECTED differential. Since it uses a larger diameter axle shaft it needs bearings with a larger inside
diameter. This was not documented anywhere in the manual, which I consider to be a significant failing
on the part of Auburn Gear. And since I was doing the work on a weekend I couldn't get in touch with
their technical support. So we decided to push on with doing the front axle.
I made an executive decision to procede with the front gear installation. I know I have mismatched gears
and that I can't run in 4WD until they are matched but all I need is a couple of bearings and I will
finish the install in a week.

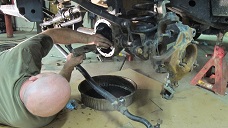 We started by tearing down the front axle. You start by draining the gear lube in the differential.
The JK axle comes with a drain plug in the bottom, on the driver's side. After the fluid is out, you
continue by removing the tires, followed by the brakes, then the unit bearings. They use some bolts with
12 point heads, so have the right type of wrench or socket. After removing the nut at the end of the
axle shaft, the unit bearing can be taken out. It does require a bit of effort. Especially if it's
been in there for a long time. Fortunately, I had just under 8,000 miles on my Jeep so they weren't so
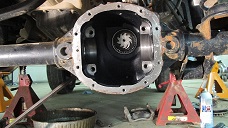
hard to remove. After the unit bearings are removed, the axle shafts can be removed. After taking out
the axle shafts, you need to remove the drivers side of the tie rod to give you better access to the
differential After that, remove the cover and the differential itself can be removed. It's important
to mark the bearing caps to ensure they can be replaced exactly the way they came out. It's also very
important to keep track of the shims that come out on either side of the differential. They may look
the same but they can be different in thickness by tens of thousands of inches. Finally, the pinion can
be removed. It takes several hundred foot pounds of torque to remove the nut. If you don't have a
bigger than industrial strength impact gun you need a really big breaker bar with at least a 3/4" or 1"
drive to handle the 5 foot long extension you need to put on the breaker bar. You can use the flange
bolts with a pry bar wedged between them and the ground to keep the pinion from rotating. After the
pinion nut is removed you can drive out the pinion with a punch and a hammer, follwed up by driving out
the bearing races.
We started by tearing down the front axle. You start by draining the gear lube in the differential.
The JK axle comes with a drain plug in the bottom, on the driver's side. After the fluid is out, you
continue by removing the tires, followed by the brakes, then the unit bearings. They use some bolts with
12 point heads, so have the right type of wrench or socket. After removing the nut at the end of the
axle shaft, the unit bearing can be taken out. It does require a bit of effort. Especially if it's
been in there for a long time. Fortunately, I had just under 8,000 miles on my Jeep so they weren't so
hard to remove. After the unit bearings are removed, the axle shafts can be removed. After taking out
the axle shafts, you need to remove the drivers side of the tie rod to give you better access to the
differential After that, remove the cover and the differential itself can be removed. It's important
to mark the bearing caps to ensure they can be replaced exactly the way they came out. It's also very
important to keep track of the shims that come out on either side of the differential. They may look
the same but they can be different in thickness by tens of thousands of inches. Finally, the pinion can
be removed. It takes several hundred foot pounds of torque to remove the nut. If you don't have a
bigger than industrial strength impact gun you need a really big breaker bar with at least a 3/4" or 1"
drive to handle the 5 foot long extension you need to put on the breaker bar. You can use the flange
bolts with a pry bar wedged between them and the ground to keep the pinion from rotating. After the
pinion nut is removed you can drive out the pinion with a punch and a hammer, follwed up by driving out
the bearing races.
 Once the axle is disassembled, you can start the gear install. On the JK, you need to put a shim between
the head of the pinion and the bearing. We reused the factory shim on ours as a staring point. We used
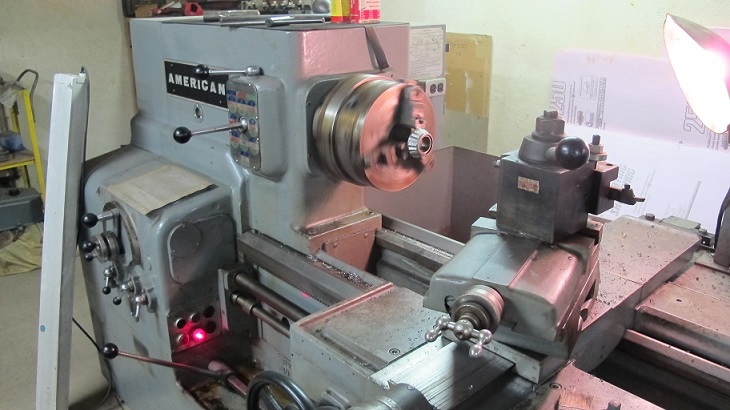
a press to push the bearing on. After that, we took the old outer bearing and put it on the lathe to
grind out the inner diameter a few thousandths. This allows you to slide it on and off while you do the
work to adjust the shims. Had we been thinking, we would have done the same with the inner bearing
but it turned out that we didn't need to. Once we had our outer setup bearing we assembled the pinion
into the housing and started with the differential itself.
Once the axle is disassembled, you can start the gear install. On the JK, you need to put a shim between
the head of the pinion and the bearing. We reused the factory shim on ours as a staring point. We used
a press to push the bearing on. After that, we took the old outer bearing and put it on the lathe to
grind out the inner diameter a few thousandths. This allows you to slide it on and off while you do the
work to adjust the shims. Had we been thinking, we would have done the same with the inner bearing
but it turned out that we didn't need to. Once we had our outer setup bearing we assembled the pinion
into the housing and started with the differential itself.
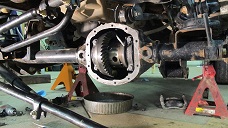
 Fortunately, the Dana 30 uses shims on the outside of the bearings. This means you don't have to remove
the bearings if you need to replace the shims. We started with the same shims the factory used in the
same location. This usually gets you close to where you need to be. We installed the new differential
into the housing and painted on the gear marking compound. After having some bad luck early in the day
we managed to find some good luck. The factory shims worked exactly perfectly with the new gears. We
used a dial indicator to check the backlash and it was right at 8 thousandths, which is right in spec.
When we turned the gears and check the pattern in the marking compound we saw a pattern that was just
about perfect. After we took out the differential and checked the pinion, it too had marking compound
exactly were it needed to be. Because of that we didn't have to adjust a single shim.
Fortunately, the Dana 30 uses shims on the outside of the bearings. This means you don't have to remove
the bearings if you need to replace the shims. We started with the same shims the factory used in the
same location. This usually gets you close to where you need to be. We installed the new differential
into the housing and painted on the gear marking compound. After having some bad luck early in the day
we managed to find some good luck. The factory shims worked exactly perfectly with the new gears. We
used a dial indicator to check the backlash and it was right at 8 thousandths, which is right in spec.
When we turned the gears and check the pattern in the marking compound we saw a pattern that was just
about perfect. After we took out the differential and checked the pinion, it too had marking compound
exactly were it needed to be. Because of that we didn't have to adjust a single shim.
 At this point it was time to start final assembly. We removed the setup bearing and put the last parts
in place. One of those parts is a crush sleeve. It is designed to keep the bearings in place so they
don't wear out prematurely. But, as its name implies, needs to be crushed in place. That means turning
a wrench with a very long handle. The impact wrench we had wouldn't even come close. It took the same
setup to install the pinion nut as it did to remove it. And after a lot of heavy effort by my friend,
who is a lot stronger than me, the sleeve was properly crushed and the right preload was on the bearings.
After that, we driled the hole for the wiring to the differential, giving the insde of the housing a
thorough cleaning. Then we installed the differential permanently, routing the wires through the new
hole.
At this point it was time to start final assembly. We removed the setup bearing and put the last parts
in place. One of those parts is a crush sleeve. It is designed to keep the bearings in place so they
don't wear out prematurely. But, as its name implies, needs to be crushed in place. That means turning
a wrench with a very long handle. The impact wrench we had wouldn't even come close. It took the same
setup to install the pinion nut as it did to remove it. And after a lot of heavy effort by my friend,
who is a lot stronger than me, the sleeve was properly crushed and the right preload was on the bearings.
After that, we driled the hole for the wiring to the differential, giving the insde of the housing a
thorough cleaning. Then we installed the differential permanently, routing the wires through the new
hole.
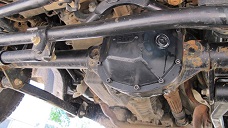 Once the internals were done, we started the reassembly. I decided to replace the differential cover
with a heavier one. Because I'm going to be driving around off road, the factory stamped sheet metal
cover doesn't hold up well to rocks so I bought a replacment cover from
Blue Torch Fab. I had it powder coated by a friend to keep it
from rusting more than anything else. When I installed it, I took the advice of an experienced off
roader and tried out a new gasket made by LubeLocker. The rest of
the reassembly is pretty easy. It's important to use anti-sieze when putting the unit bearing in. You
can opt not to do it but when you're out on the trail swapping out a shaft or a u-joint and you have to
take it apart, you'll thank me for doing it. If you don't, the bolts and the bearing itself will rust
to the point where you almost can't get them apart.
Once the internals were done, we started the reassembly. I decided to replace the differential cover
with a heavier one. Because I'm going to be driving around off road, the factory stamped sheet metal
cover doesn't hold up well to rocks so I bought a replacment cover from
Blue Torch Fab. I had it powder coated by a friend to keep it
from rusting more than anything else. When I installed it, I took the advice of an experienced off
roader and tried out a new gasket made by LubeLocker. The rest of
the reassembly is pretty easy. It's important to use anti-sieze when putting the unit bearing in. You
can opt not to do it but when you're out on the trail swapping out a shaft or a u-joint and you have to
take it apart, you'll thank me for doing it. If you don't, the bolts and the bearing itself will rust
to the point where you almost can't get them apart.
After the axle was done, we took the Jeep out for a few mile spin. We managed to find some more good
luck and ran into no problems at all. No leaks, no funny noises, no weird behavior. It all just worked.
I'm still waiting on my switch panel that will attach to the A pillar on the Jeep so I can get the switch
wired up. And once I get the right bearings and install the rear end I'll be anxious to get the bigger
tires installed.
Return to My JK
Return to grimmjeeper.com
 Once I found someone with the right tools and shop space to do the gear install, I ordered the parts I
needed to install them. There are several specialist tools required to do gear installation, and working
with someone who has experience makes a lot of difference. While I'm an accomplished shade-tree
mechanic, I don't have the expertise or specialty tools I needed. Fortunately, a friend in my local
Jeep club does have the experience and the tools needed to get the job done.
Once I found someone with the right tools and shop space to do the gear install, I ordered the parts I
needed to install them. There are several specialist tools required to do gear installation, and working
with someone who has experience makes a lot of difference. While I'm an accomplished shade-tree
mechanic, I don't have the expertise or specialty tools I needed. Fortunately, a friend in my local
Jeep club does have the experience and the tools needed to get the job done.