Upgrading to TFI Ignition on the AMC V8
One of the more common upgrades on the AMC I6 and V8 engines is to swap out some of the components of the
factory supplied ignition for parts that will give you a hotter spark. In the 80's, AMC used Motorcraft
(Ford) ignition parts on its V8 engines. This basic ignition system is generally reliable and it gets
the job done. However, even as AMC was using this system in the 80's, Ford had come up with a better
system. Starting in the early 80's, Ford started switching over to TFI (Thick Film Ignition). The coil
is designed to produce a much higher voltage burst for each spark. This hotter spark will help the
combustion process. There is no small amount of debate about how much it really helps. Many of the
people who install this system report significant improvements in throttle response and even noticeable
gains in horsepower. It is suggested that simply swapping out the plugs and wires would have made
almost as much difference. Regardless, the upgrade is simple, quick and not expensive.
The best part about this upgrade is that you don't have to replace a lot of expensive parts with
complicated installation instructions. Installing an aftermarket ignition system can be a lot of work.
The TFI upgrade replaces a few easy to access parts on the distributor, the coil, spark plugs and wires.
Since the factory AMC ignition was a Ford unit built for AMC, all of the Ford parts swap in with no
problems.
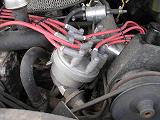
The biggest issue with installing a higher power coil to the factory ignition system is that the cap
is too small. As the rotor turns underneath the cap, it passes by the posts that the wires attach to.
When the coil fires, the spark jumps to the post the rotor is closest to before going on to the spark
plug. When you bump up the voltage with a hotter coil, the spark tends to jump to the neighboring posts
causing more than one spark plug to fire. The solution that Ford came up with is to make an adapter that
attaches to the distributor. The cap is noticeably bigger and the posts are farther apart. This
prevents the spark from jumping to multiple posts. It's really that simple.
When you go to the parts store, they will inevitably ask you what vehicle the parts are for. When you
tell them that you're adapting one thing to another they may not understand what you want to do. I find
it's best to go in knowing a vehicle you can tell them. The parts are not for that vehicle but it's just
easier than trying to explain what you're doing. For my purposes, I tell them I'm getting parts for a
1984 Ford F350 with the 460ci (7.5l) gas engine. I got my parts from Autozone but any parts store should
have what you need. And this is what you need:
- A distributor cap adapter (Autozone F958). This part clips to the base of the distributor
- A distributor cap and rotor (Autozone F2103G). This is the rotor and the cap itself.
- An ignition coil. I used a Ford style replacement from a 1989 F350 7.5l (Autozone C839). Most
aftermarket coils will work just as well. I have run into some canister style coils that tend to be a
little too tall and they will hit the hood when you try to close it. If you decide to use a coil from
someone like MSD or Accel, compare the height to a factory coil.
- New spark plugs. With the hotter spark, you want to make sure to use plugs with the correct heat
range. And be sure you gap them correctly. The lead can get bent so you need to be very sure you
verify they are correct when you put them in the engine. I bought Champion RN12YC and gapped them to
0.045". Any parts store will be able to use that number to find "better" plugs in the right heat
range.
- Antisieze compound. Not strictly necessary but it does help when you go to pull the plugs in a few
years
- New plug wires. The plugs on the TFI cap are different than the ones on the stock distributor cap.
No one makes a set of pre-made wires with the correct lengths and ends. I used a generic set of MSD
wires. I cut them to fit and crimped the ends on myself. Be sure to get straight plugs for the spark
plug end and HEI/TFI style plugs for the other end.
- Dielectric grease. It's supposed to help make a more solid electrical connection when you install
the wires. I use it most of the time. However, when I don't I don't usually have any trouble. It's
cheap so why not.
- Spark plug socket
- Socket wrench
- Torque wrench
- Assorted socket extensions
- Wire cutters
- Bench vise (if needed to crimp the spark plug wires)
Before you disconnect anything, make sure you know to get the wires back on in the right order. If you
pull the wires and don't have any idea how to put them back on right, you're stuck. For reference, the
firing order of the AMC V8 is 1-8-4-3-6-5-7-2. The cylinders are numbered like a Chevrolet engine. The
#1 cylinder is the front cylinder on the right hand side as you face the front of the vehicle with #3, #5
and #7 in a line towards the firewall. The #2 cylinder is in front on the left hand side with #4, #6 and
#8 as you go back. Note where the #1 wire plugs in. That's where you start counting when you're putting
the wires back on.
Once you have all the parts, it's time to start disassembly. You can pull the spark plug wires and the
wire that goes to the coil. After that, you can remove the plastic cap from the top of the distributor.
It's held on by a couple of clips. Once you take off the cap, you can pull off the rotor. As long as
you don't pull out the distributor, you don't have to worry about adjusting anything. The rotor only
goes in one way. Don't remove plugs yet. If you pull all the plugs things can get into the cylinders
and cause all sorts of trouble. I wait to pull them until I'm ready to put in the replacement plug.
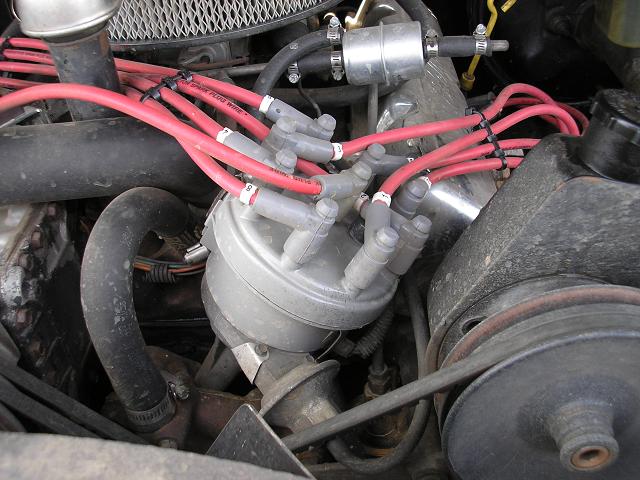
The cap adapter, rotor and cap all are keyed so they only go on one way. Start with the cap adapter.
You may need to rotate it to get it to sit flat. Once you get it in place, the clips on the distributor
should snap in place to hold it on. Next, put the rotor on the shaft and make sure it doesn't spin.
It will go on facing exactly the same direction the old one did before you took it off. Finally, put
the cap on and clip it in place.
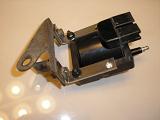
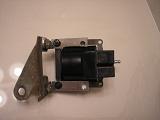
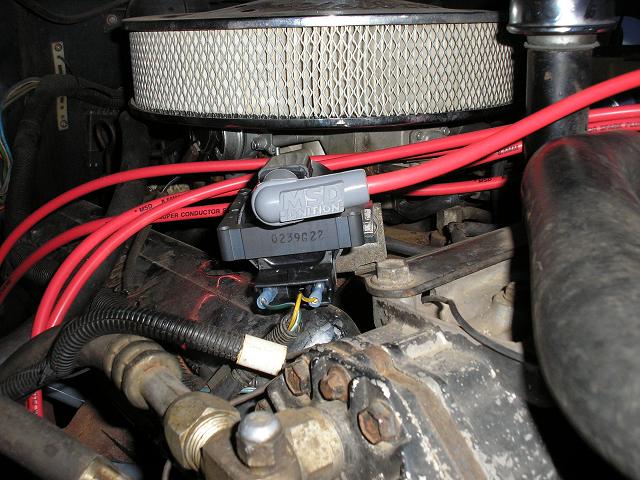
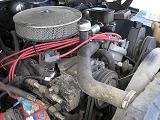
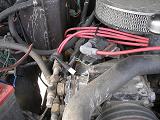 Figure out where you want to put the coil. If you put your coil on the firewall or on one of the
fenders, it may affect how you use the plug wires from your kit. I decided to put my coil in the factory
location. I built a very simple bracket to hold the coil. The coil comes with holes in the case that
are roughly the same distance apart as the attachment points for the canister bracket in the base
bracket. I went to the hardware store and found some 2-1/2" L-brackets. On the end that attached to
the factory base bracket, I cut them short and opened up the hole from 1/4" to 3/8" to let the factory
screws fit. When I put the coil up against the brackets I noticed that the offset holes in the bracket
were causing one of the brackets to rub up against the coil housing. So I broke out the grinder and
shaved a bit off. It's still there to support the coil but it doesn't contact the plastic housing.
Once I got that to fit I took some 1-1/4" #10 machine screws with some lock washers and attached the
brackets to the coil. I tightened everything down and bolted the base bracket to the engine.
Figure out where you want to put the coil. If you put your coil on the firewall or on one of the
fenders, it may affect how you use the plug wires from your kit. I decided to put my coil in the factory
location. I built a very simple bracket to hold the coil. The coil comes with holes in the case that
are roughly the same distance apart as the attachment points for the canister bracket in the base
bracket. I went to the hardware store and found some 2-1/2" L-brackets. On the end that attached to
the factory base bracket, I cut them short and opened up the hole from 1/4" to 3/8" to let the factory
screws fit. When I put the coil up against the brackets I noticed that the offset holes in the bracket
were causing one of the brackets to rub up against the coil housing. So I broke out the grinder and
shaved a bit off. It's still there to support the coil but it doesn't contact the plastic housing.
Once I got that to fit I took some 1-1/4" #10 machine screws with some lock washers and attached the
brackets to the coil. I tightened everything down and bolted the base bracket to the engine.
 Wiring the coil is pretty simple. The factory put a large plastic clip that slips onto the top of the
coil. I cut the wires going to this clip and crimped on some weather tight female spade connectors.
They attach directly to the coil. The green wire attaches to the coil negative ("-") and the yellow
goes to the coil positive ("+"). The factory uses what is called a "resistance wire" to go between the
ignition box and the coil. There is quite a bit of discussion about whether or not this is necessary
when using the TFI coil. The purpose of the wire is to drop the voltage going to the coil and reduce
the load on the ignition controller. If you use the stock coil and no resistor wire, you'll run too
much current through the controller and burn it out. Some people take the resistance wire out of the
loop and have no trouble. Others burn out controllers. I figure the extra 1 or 2 horsepower I would
get without the resistor wire isn't worth the hassle of dealing with a dead ignition controller so I just
left it in place. Also, some people remove (or don't bother to replace the broken) capacitor that comes
with the factory coil. You'll notice that I don't have it installed in my pictures. I get no ignition
noise in my aftermarket radio so I figure it doesn't make any real difference.
Wiring the coil is pretty simple. The factory put a large plastic clip that slips onto the top of the
coil. I cut the wires going to this clip and crimped on some weather tight female spade connectors.
They attach directly to the coil. The green wire attaches to the coil negative ("-") and the yellow
goes to the coil positive ("+"). The factory uses what is called a "resistance wire" to go between the
ignition box and the coil. There is quite a bit of discussion about whether or not this is necessary
when using the TFI coil. The purpose of the wire is to drop the voltage going to the coil and reduce
the load on the ignition controller. If you use the stock coil and no resistor wire, you'll run too
much current through the controller and burn it out. Some people take the resistance wire out of the
loop and have no trouble. Others burn out controllers. I figure the extra 1 or 2 horsepower I would
get without the resistor wire isn't worth the hassle of dealing with a dead ignition controller so I just
left it in place. Also, some people remove (or don't bother to replace the broken) capacitor that comes
with the factory coil. You'll notice that I don't have it installed in my pictures. I get no ignition
noise in my aftermarket radio so I figure it doesn't make any real difference.
 When you get your spark plug wires, they may come in assorted lengths. Sort them by length, longest to
shortest. If you make a mistake and cut the wire too short, you can always use it on a closer plug.
If your kit comes with just one long coil of wire and you have to crimp both ends on each one, you still
should start with the longest and go to shortest for the same reason. Start with the #8 cylinder, which
is the farthest one from the distributor. Run the wire from the distributor to the spark plug. Leave
some room for it to move around and make sure it doesn't interfere with anything. Cut it to the length
you want and crimp the end on the wire. Go on to the #6, #4 and #2 wires. Then do the #7, #5, #3 and #1
wires. Finally, install the wire from the coil to the distributor. If you want, you can dress up the
wires a little. There are plenty of wire organizers out there. Or you can use a couple of zip ties
like I did. Before I plug them in for the final time, I put some dielectric grease on the connector to
make sure I have a good solid electrical connection.
When you get your spark plug wires, they may come in assorted lengths. Sort them by length, longest to
shortest. If you make a mistake and cut the wire too short, you can always use it on a closer plug.
If your kit comes with just one long coil of wire and you have to crimp both ends on each one, you still
should start with the longest and go to shortest for the same reason. Start with the #8 cylinder, which
is the farthest one from the distributor. Run the wire from the distributor to the spark plug. Leave
some room for it to move around and make sure it doesn't interfere with anything. Cut it to the length
you want and crimp the end on the wire. Go on to the #6, #4 and #2 wires. Then do the #7, #5, #3 and #1
wires. Finally, install the wire from the coil to the distributor. If you want, you can dress up the
wires a little. There are plenty of wire organizers out there. Or you can use a couple of zip ties
like I did. Before I plug them in for the final time, I put some dielectric grease on the connector to
make sure I have a good solid electrical connection.
Once the coil and wires are in place, it's time to swap out the plugs. Again, they need to be properly
gapped. Bouncing around in the box during shipping can cause them to bend just a little. Get a decent
gapping tool and set the gap for each one. As is the case with many vehicles, getting to some of the
spark plugs can be a bit challenging. I use a spark plug socket that has the insert which holds on to
the plug and doesn't let it slide out easily. I bought a socket from Craftsman that is formed in the
shape of a large 6 point bolt on the top so I can turn it with a box end wrench when my socket wrench
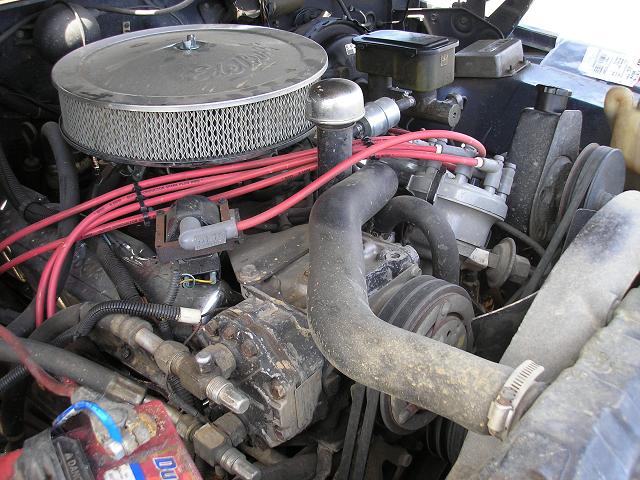
just doesn't fit. In the picture of the installed coil above you can see the heater box right next to
the engine. That box leaves little clearance for the #6 and #8 plugs. The brake booster on the other
side makes it a challenge to get to the #5 and #7 plugs as well. Having that socket I can turn with a
wrench makes getting those in and out a lot easier.
They say that spark plugs can tell the history of an engine. You can look at the condition of the
spark plugs and see if you're running lean or rich, if you're getting coolant or oil into the cylinder,
or if there are some other problems. I'm not going to get into that much detail. But if you're
interested, it's not hard to find the information. Like I said earlier, I recommend pulling one plug
at a time and replacing it with the new one. Once you have gapped the new plug, put a little anti-sieze
compound on the threads. Take out the old plug. Put the new plug in and start it by hand. Make sure
it's turning smoothly before you start hitting it with a wrench. If you cross the threads, you have just
turned an easy job into a very difficult one. If you can, use a torque wrench when you tighten the
plugs. They require 25-30 ft-lb (roughly 35-40 newton-meters). If you can't use a torque wrench, get
them "good and snug" but not "super tight". If you push too hard you will strip out the threads and
again turn an easy job into a difficult one. When I did mine I was able to get the torque wrench in
most of them. The #6 and #8 were tricky but doing it right is worth the extra effort. Again, before I
put the plug wires on, I added some dielectric grease to the contacts.
 At this point, you should be done. Since you didn't disconnect the distributor you don't absolutely
need to set the timing. The engine should start and run at least as well as it did before, if not
a little bit better. If you have the timing light available, it's never a bad thing to verify that the
timing is set properly.
At this point, you should be done. Since you didn't disconnect the distributor you don't absolutely
need to set the timing. The engine should start and run at least as well as it did before, if not
a little bit better. If you have the timing light available, it's never a bad thing to verify that the
timing is set properly.
Of course, once you're done with everything, take a minute to go over everything again to make sure you
didn't forget to tighten a bolt or leave a plug wire loose. Take the vehicle for a spin around the block
and make sure everything works like it should.
Return to my J-10
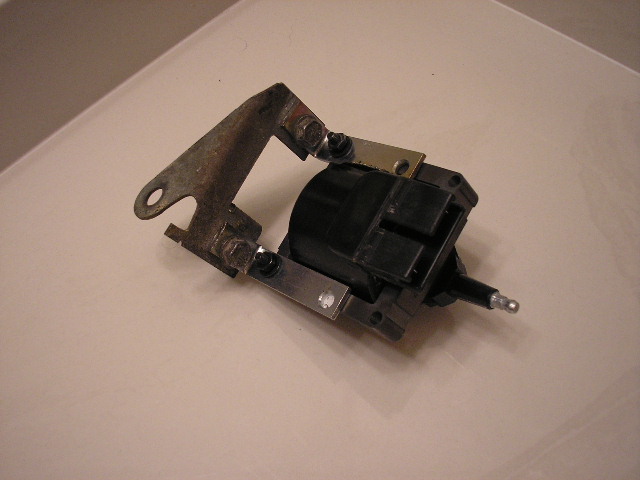


 Figure out where you want to put the coil. If you put your coil on the firewall or on one of the
fenders, it may affect how you use the plug wires from your kit. I decided to put my coil in the factory
location. I built a very simple bracket to hold the coil. The coil comes with holes in the case that
are roughly the same distance apart as the attachment points for the canister bracket in the base
bracket. I went to the hardware store and found some 2-1/2" L-brackets. On the end that attached to
the factory base bracket, I cut them short and opened up the hole from 1/4" to 3/8" to let the factory
screws fit. When I put the coil up against the brackets I noticed that the offset holes in the bracket
were causing one of the brackets to rub up against the coil housing. So I broke out the grinder and
shaved a bit off. It's still there to support the coil but it doesn't contact the plastic housing.
Once I got that to fit I took some 1-1/4" #10 machine screws with some lock washers and attached the
brackets to the coil. I tightened everything down and bolted the base bracket to the engine.
Figure out where you want to put the coil. If you put your coil on the firewall or on one of the
fenders, it may affect how you use the plug wires from your kit. I decided to put my coil in the factory
location. I built a very simple bracket to hold the coil. The coil comes with holes in the case that
are roughly the same distance apart as the attachment points for the canister bracket in the base
bracket. I went to the hardware store and found some 2-1/2" L-brackets. On the end that attached to
the factory base bracket, I cut them short and opened up the hole from 1/4" to 3/8" to let the factory
screws fit. When I put the coil up against the brackets I noticed that the offset holes in the bracket
were causing one of the brackets to rub up against the coil housing. So I broke out the grinder and
shaved a bit off. It's still there to support the coil but it doesn't contact the plastic housing.
Once I got that to fit I took some 1-1/4" #10 machine screws with some lock washers and attached the
brackets to the coil. I tightened everything down and bolted the base bracket to the engine.